Customizing Autoware
In this page, we explain how Autoware can be customized, including how new packages can be added into Autoware.
We also introduce "Autoware-Mini", which is a smaller version of Autoware that has fewer features than Autoware but is easier to understand and customize.
How to customize and use Autoware packages
- Copy the original package and change the following
- package name
- Folder name
- code
- package.xml
- CMakeLists.txt
- place in aichallenge_submit
- modify launch file called from autoware_universe_launch
- Reference example: pose_initializer_custom (called from autoware_universe_launch/tier4_localization_launch/launch/util/util.launch.xml)
Autoware-Mini
Although the default Autoware is feature-rich and includes many components, the extra layer of complexity and the multiply nested launch files can be confusing for beginners or users who have simpler and more relaxed use cases.
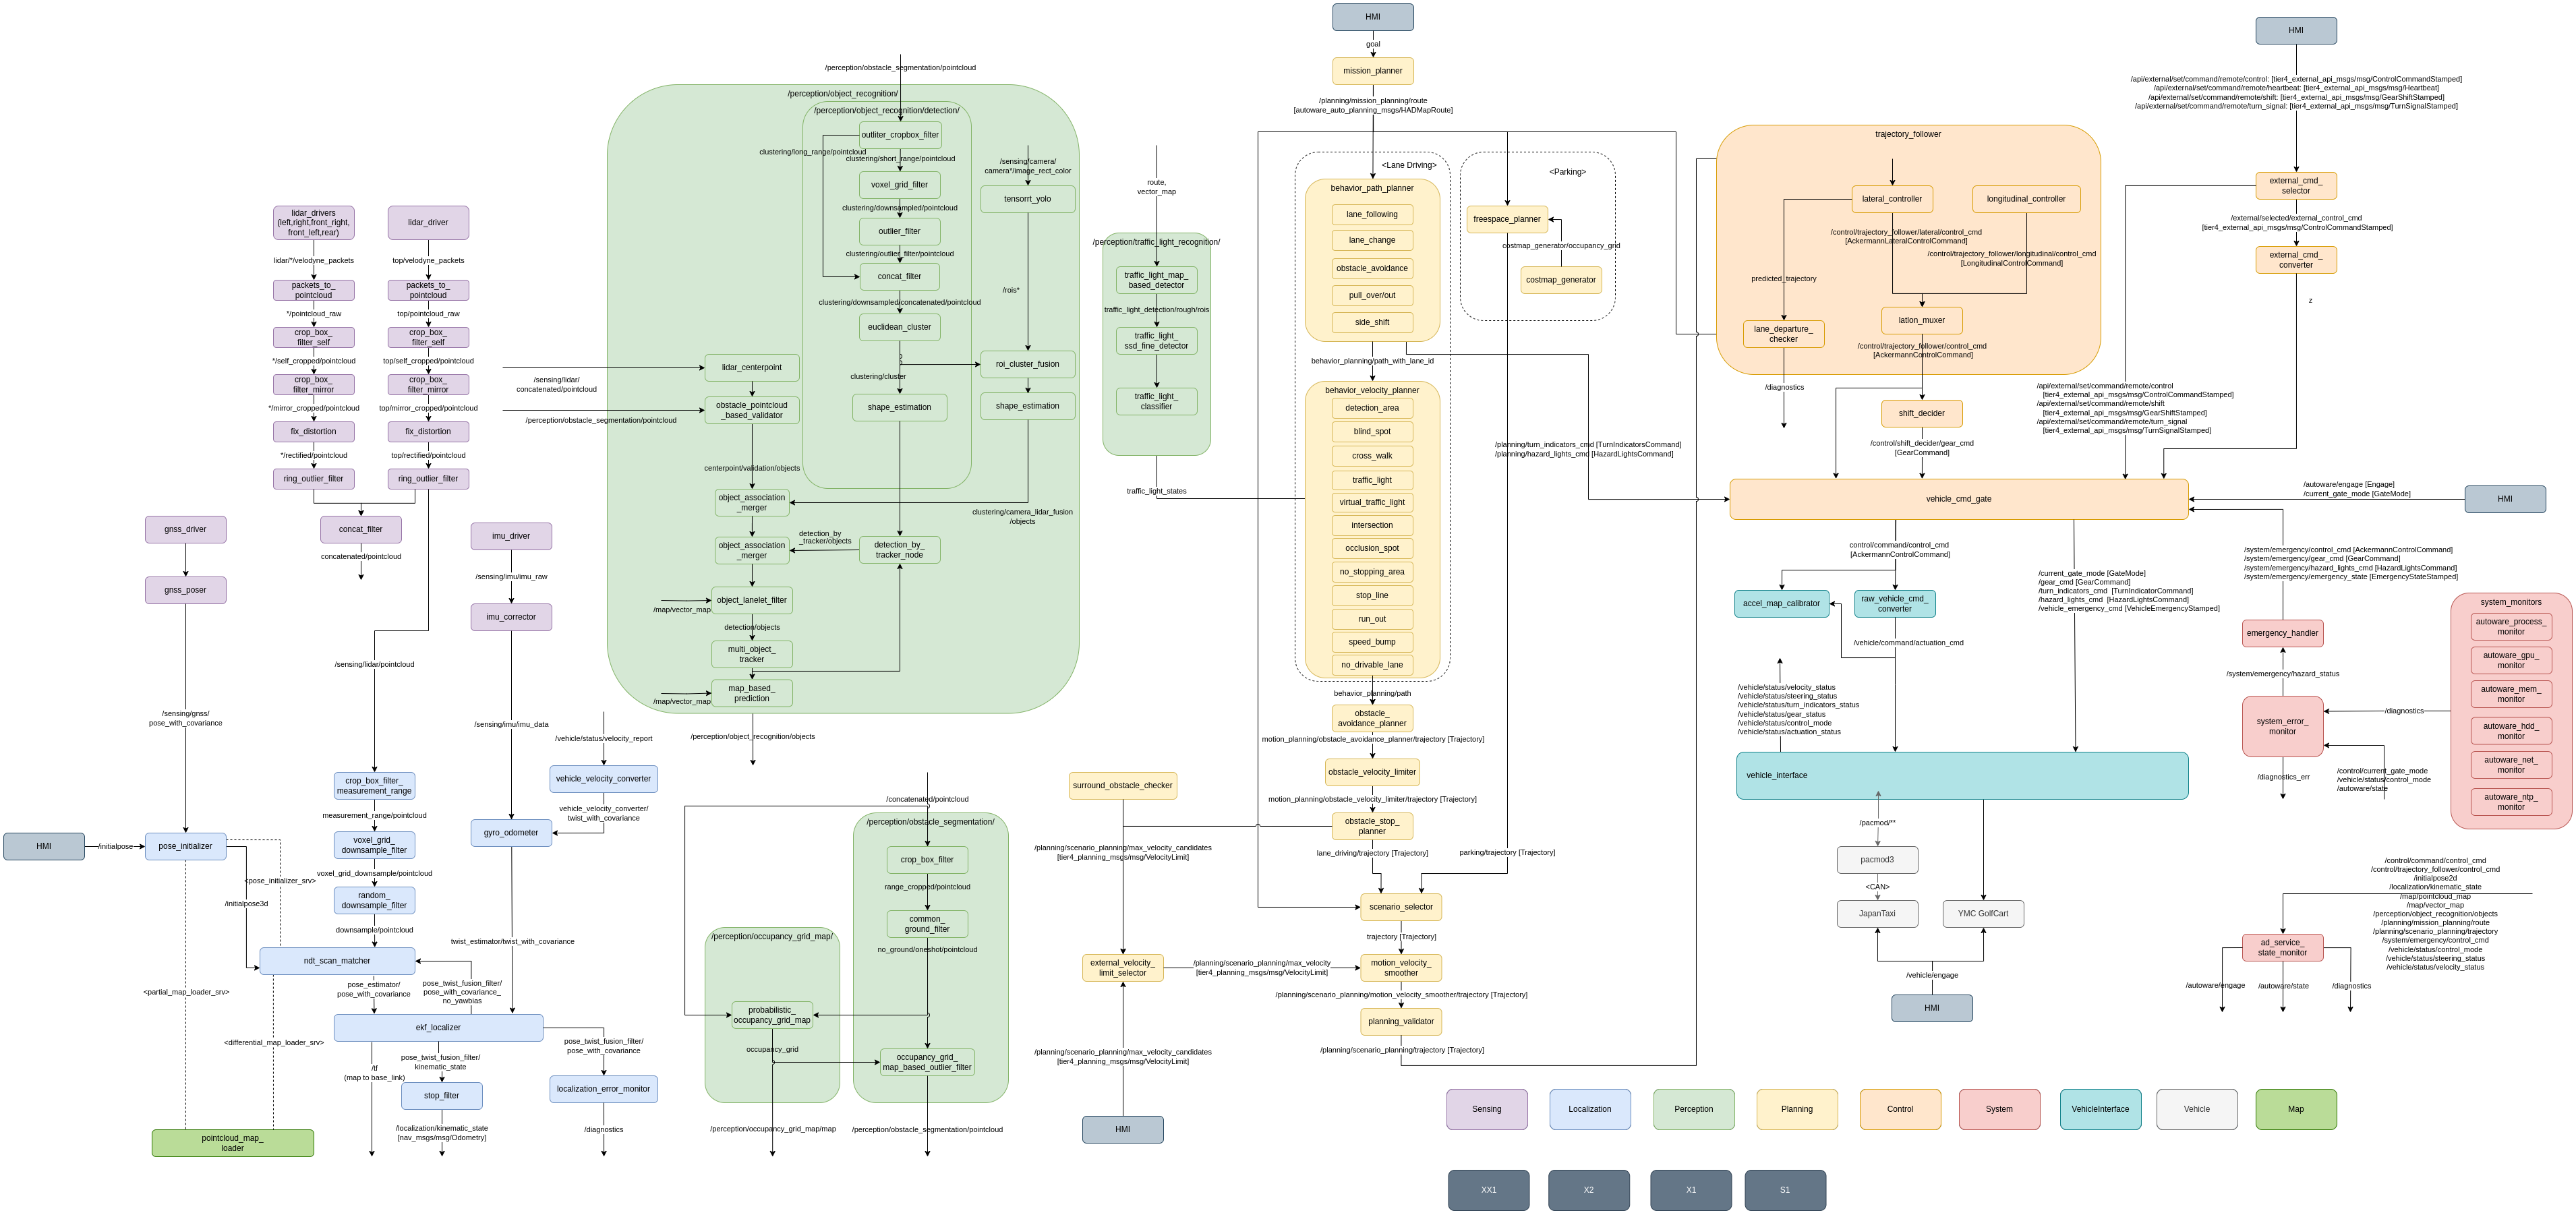
A node diagram of the original Autoware is depicted below. This can also be found on the Autoware Official Documentation.

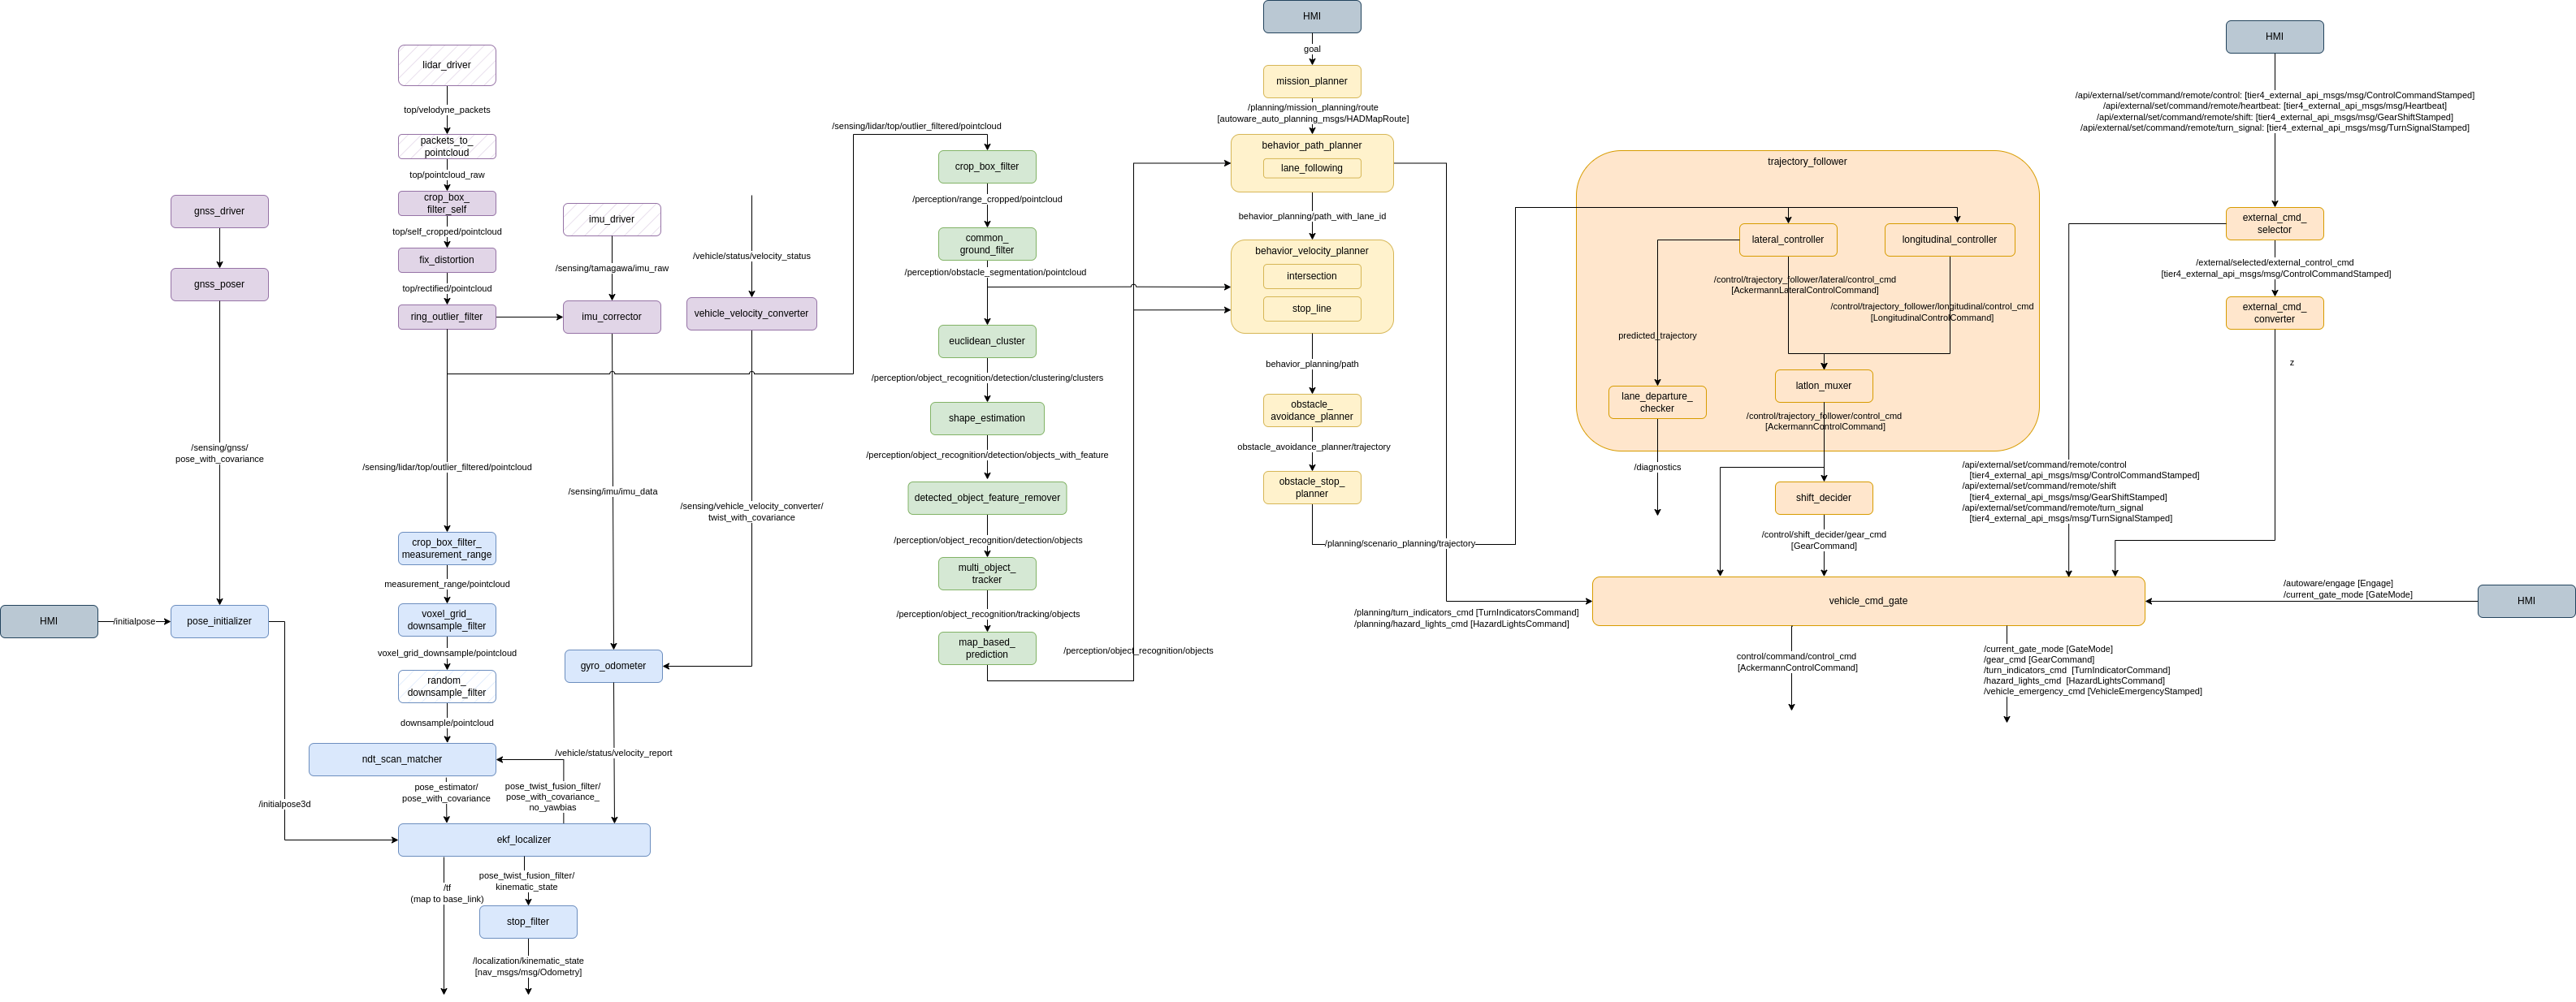
In Autoware-Mini, we tried to design a launch file that launches only the most basic nodes that are crucial for a simple lane-following scenario. By limiting the features, we aim to create a simpler version of Autoware: one that is easier to understand for users first trying out Autoware. Most nodes are launched directly from this "Autoware-Mini" launch file, so there is no need to traverse through layers of launch files to reach the actual part of the code where a node is actually created. Furthermore, instead of using arguments and variables to define parameters in different launch files, we specify the parameters necessary for a specific node when launching the node. So, there is less work to change parameters or "find" where they are actually defined.
Participants of this competition can use this Autoware-Mini to:
- Better understand the workings of Autoware with a simpler design
- Use a different implementation to replace certain modules (simply by removing the part from the launch file and adding in yours!)
- More clearly see the effects of changing a parameter
- Plug-in other Autoware nodes to enhance performance
The below is a node diagram of Autoware-Mini

Using Autoware-Mini
Here we describe how to set up Autoware-Mini and use it.
Pulling newest changes from GitHub
For participants who have already set up aichallenge2023-sim, run the below to pull the newest changes from GitHub.
cd aichallenge2023-sim/
git pull
The launch file for Autoware-Mini is placed in aichallenge2023-sim/docker/aichallenge/aichallenge_ws/src/aichallenge_submit/aichallenge_submit_launch/launch/autoware_mini_awsim.launch.xml (GitHub Link)
Updating aichallenge_submit.launch.xml
In order to launch autoware_mini_awsim.launch.xml, aichallenge_submit.launch.xml must first be edited.
Uncomment the sections in this file that are commented out, and comment out the section that launches e2e_simulator.launch.xml.
<?xml version="1.0" encoding="UTF-8"?>
<launch>
    <!-- Autoware -->
    <!-- <include file="$(find-pkg-share autoware_launch)/launch/e2e_simulator.launch.xml">
        <arg name="vehicle_model" value="golfcart"/>
        <arg name="sensor_model" value="awsim_sensor_kit"/>
        <arg name="map_path" value="/aichallenge/mapfile"/>
        <arg name="rviz" value="false"/>
    </include> -->

    <!-- Uncomment the following lines to try Autoware-Mini -->
    <include file="$(find-pkg-share aichallenge_submit_launch)/launch/autoware_mini_awsim.launch.xml" >
      <arg name="vehicle_model" value="golfcart"/>
      <arg name="sensor_model" value="awsim_sensor_kit"/>
      <arg name="map_path" value="/aichallenge/mapfile"/>
      <arg name="rviz" value="false"/>
    </include>

    <include file="$(find-pkg-share initialpose_publisher)/launch/initialpose_publisher.launch.xml" />

    <include file="$(find-pkg-share self_driving_controller)/launch/self_driving_controller.launch.xml" />
</launch>
Updating aichallenge.launch.xml
In order to change how the GUI tool "Rviz2" looks when launching Autoware-Mini, we will change the Rviz2 config file to one that is more suitable for Autoware-Mini.
Change aichallenge.launch.xml like the following.
<?xml version="1.0" encoding="UTF-8"?>
<launch>
    <!-- RViz parameters -->
    <arg name="rviz2" default="true" description="launch rviz"/>
    <!-- <arg name="rviz_config" default="$(find-pkg-share autoware_launch)/rviz/autoware.rviz" description="rviz config"/> -->

    <!-- Below is a more suitable RViz2 config for trying out Autoware-Mini -->
    <arg name="rviz_config" default="$(find-pkg-share autoware_launch)/rviz/autoware-mini.rviz" description="rviz config"/>

    <!-- Scoring -->
    <include file="$(find-pkg-share aichallenge_scoring)/launch/aichallenge_scoring.launch.xml">
        <arg name="result_score_topic" value="/aichallenge/score" />
    </include>

    <node pkg="aichallenge_scoring_result" exec="scoring_result" name="scoring_result" output="screen" />

    <!-- Submitted Package -->
    <include file="$(find-pkg-share aichallenge_submit_launch)/launch/aichallenge_submit.launch.xml" />

    <!-- RViz -->
    <group>
        <node pkg="rviz2" exec="rviz2" name="rviz2" output="screen" args="-d $(var rviz_config) -s $(find-pkg-share autoware_launch)/rviz/image/autoware.png" if="$(var rviz2)"/>
    </group>
</launch>
Updating behavior_path_planner.param.yaml
Next, for the behavior_path_planner node and behavior_velocity_planner node in the Planning Component, the following config files must be edited to change what modules are launched within each planner.
In the original Autoware, the following modules are enabled in the behavior_path_planner node.
- lane_change
- pull_out
- side_shift
- pull_over
- avoidance
For Autoware-Mini, we will turn them all OFF for now.
...

lane_change:
  enable_module: false
  enable_simultaneous_execution: false
  priority: 4
  max_module_size: 1

pull_out:
  enable_module: false
  enable_simultaneous_execution: false
  priority: 0
  max_module_size: 1

side_shift:
  enable_module: false
  enable_simultaneous_execution: false
  priority: 2
  max_module_size: 1

pull_over:
  enable_module: false
  enable_simultaneous_execution: false
  priority: 1
  max_module_size: 1

avoidance:
  enable_module: false
  enable_simultaneous_execution: false
  priority: 3
  max_module_size: 1
Updating behavior_velocity_planner.param.yaml
Next, for the behavior_path_planner node and behavior_velocity_planner node in the Planning Component, the following config files must be edited to change what modules are launched within each planner.
In the original Autoware, the following modules are enabled in the behavior_velocity_planner node.
...
launch_stop_line: true
launch_crosswalk: true
launch_traffic_light: true
launch_intersection: true
launch_blind_spot: true
launch_detection_area: true
launch_virtual_traffic_light: true
launch_occlusion_spot: false
launch_no_stopping_area: true
launch_run_out: false
launch_speed_bump: false
For Autoware-Mini, we will turn everything except the "stop_line module" to OFF.
...
# Autoware-Mini (Uncomment the lines below to try Autoware-Mini)
launch_stop_line: true
launch_crosswalk: false
launch_traffic_light: false
launch_intersection: false
launch_blind_spot: false
launch_detection_area: false
launch_virtual_traffic_light: false
launch_occlusion_spot: false
launch_no_stopping_area: false
launch_run_out: false
launch_speed_bump: false
Run Autoware-Mini
This concludes the preparation necessary for launching Autoware-Mini. You can now launch AWSIM and launch Autoware-Mini with the following commands.
# Inside the Rocker container
cd /aichallenge
bash build.sh
bash run.sh